Monday, May 26, 2014

Pretty pink raspberry macarons


This weekend we had raspberry white chocolate macarons. I know it's a bit of a rehash, I make them all the time, although I haven't included any pictures in the blog for the longest while.


But they are so good and creamy and melt in the melt with a crisp little shell. Well you get the picture.

I guess there is a reason why I make them all the time........


I made up chocolate ones as well, but the pink ones always seem to have my heart. I've popped the recipe below, which is as I said already a revisit of my previous recipe. The filling is right at the bottom, and remember to fill them the day before you need to serve.


Macaron Shells makes around 30 filled macarons
Fill the shells with the filling (included after recipe for shells) at least 1 day before you serve to get the correct consistency. Store in an airtight container in fridge and then bring to room temperature about 30 minutes prior to serving.

190 gram (6 5/8 oz)almond meal (almond flour)
190 gram pure icing sugar (6 5/8 oz powdered sugar)
190 gram granulated sugar (6 5/8 oz)
48 grams water (1 5/8 oz)
140 gram egg whites aged split into 2 lots of 70grams each (5 oz split into 2 lots of 2 1/2oz each)*
food color of choice (I use gel type food color like Wilton)

*ageing egg whites refers to separating the yolks from whites and then leaving the whites to age for a few days. This can be done on the counter if your countries climate permits or in the fridge, wrap the bowl with plastic wrap and then pop a few holes in the top. Alternately you can pop fresh egg whites in the microwave on high for 10 seconds or so - I used the microwave method in this batch pictured.

1. Mix the ground almonds and icing sugar together and pulse a few times in food processor to make almond meal finer. Do not over process as the meal can become oily. Sieve into a large bowl. Add colour and 70g (2 1/2 ounce) of the egg whites to the sugar/almond mixture but don’t mix in.


2. Place remaining 70g (2 1/2 ounce) of egg whites in bowl of mixer fitted with the whisk.

Yup - I really use this super old fashioned thermometer I have had for about 20 years to make my macarons

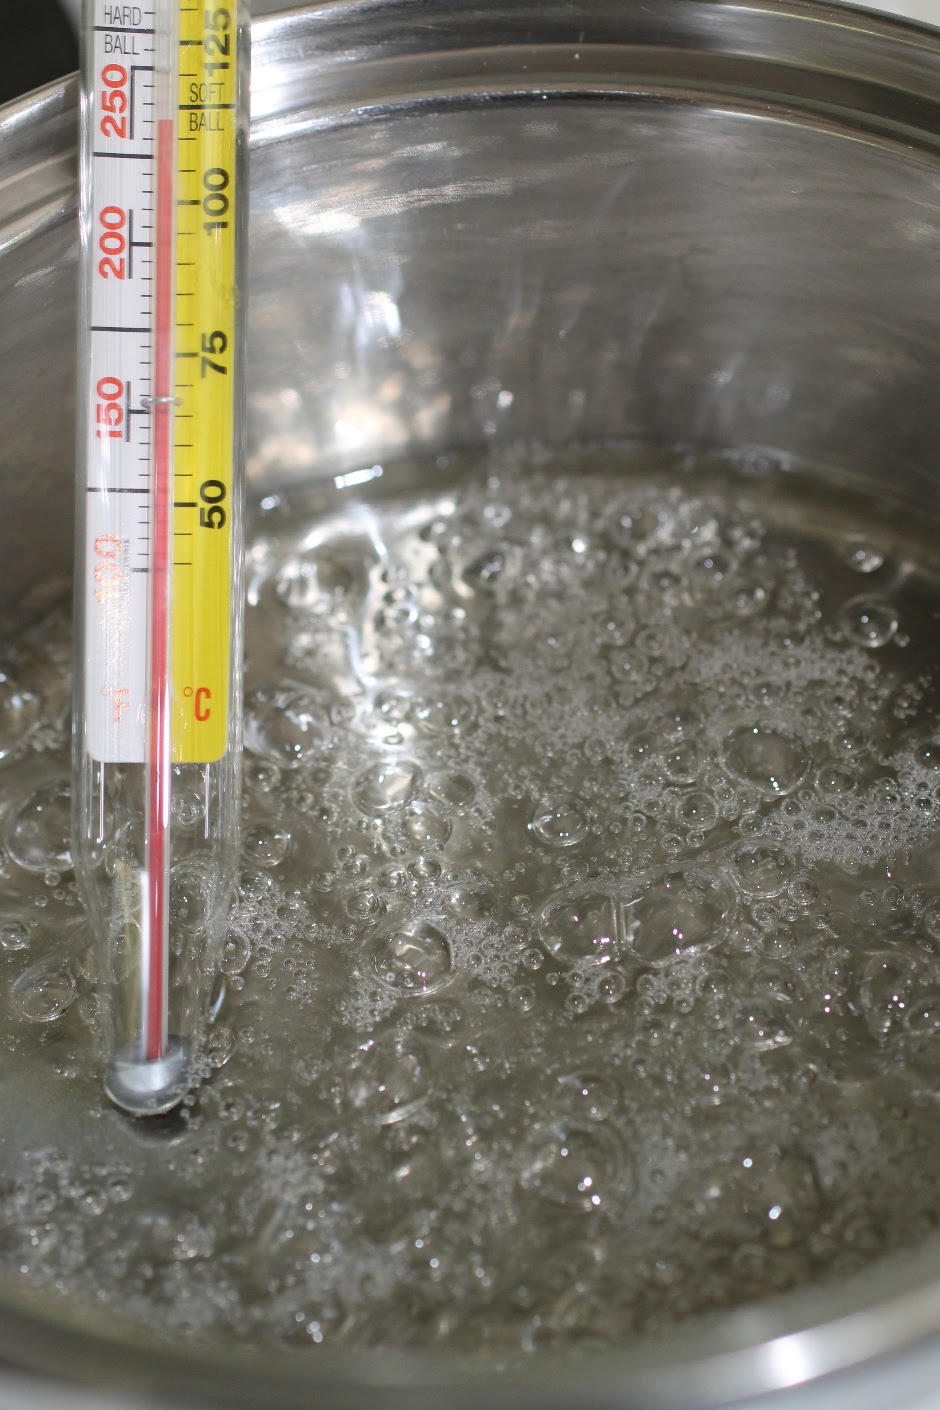
3. Pop granulated sugar and water into saucepan stir to combine and cook without stirring to 118C (245 F). Brush down the sides with a pastry brush dipped in water as required to avoid the sugar crystallizing. Once the mixture reaches 115C (240 F) start mixing the egg whites on high. Make sure you have a pouring shield on your mixer, when the sugar syrup reaches 118C (245 F)remove from heat and immediately pour in a thin stream down the side of the mixer bowl continuing to whisk on high.

4. Continue to whisk the meringue on high until the side of the bowl is only a little warm to touch, around 50C (120 F).


5. Add meringue mixture to almond mixture and using a large spatula fold the mixture together until it starts to shine and forms a ribbon that disappears back into the mixture after about 20 seconds.


6. Add the mixture to a piping bag fitted with a plain tip (or just cut the end of a disposable piping bag, that's what I do) and pipe in lines onto parchment lined baking sheets. To make the macarons as even as possible I apply a constant slow pressure to the piping bag and count a few numbers like up to 3 for each one.


Waiting to form skins after piping

If your mixture has peaks after you have piped a couple of rows that do now sink back down you macaron mixture needs more mixing. Pop it back in the bowl and mix it a bit more

7. Set aside for about 30 minutes or until the macarons have formed a skin so that the macaron mixture does not stick to your finger when gently touched. If the weather is humid this step may take longer up to 2 hours. I pop on the aircon if it's humid at my house.

Baking in the oven. The macarons will rise after a few minutes in the oven and develop a frilly foot
Eeek- can you see some of those less than perfect under mixed mac's in the back  that I pointed out 
in the previous picture - they do not have a flat shiny top. That's so not mac-cool

8. Meanwhile preheat oven to 140C (285 F). Once ready bake the macaroons for around 13 to 15 minutes depending on size, it may take longer, all ovens are different. If they are baked and you gently push on the side the tops will not move, if the tops do move do bake for another minute or 2. Also they should not be browned if they are reduce the heat for the next batch or bake for less time.

9. Once baked remove the baking trays and immediately slide off the macarons and the parchment onto the work surface and let cool completely before removing the shells.

10. Once cooled match disks into like sizes and sandwich together using the ganache.

Raspberry White Chocolate Filling


To make ganache melt white chocolate with cream in the microwave and mix gently until combined, use a ration of 3:1, so for example 360 grams white chocolate to 120 grams cream, sorry guys I measure as I already have the scales out and I can't be bothered messing up a liquid measuring jug :) Add some pink gel color and raspberry flavor to taste.


Linda Vandermeer is a blogger, baker, maker and author of the cookbook ' Sweets on a Stick': More than 150 kid friendly recipes for cakes, candies, cookies and pies on the go!. Published in the US the book is available at most online book stores.

Original Ideas, photography and recipes by Linda Vandermeer do not reuse without permission. 

Sunday, May 18, 2014

Lemon cream curd and raspberry tartlettes


These lemon cream tartlettes are the perfect little treat for a sweet afternoon tea.

Not too tart, the addition of cream to lighten the curd makes the filling sweet and tangy with a smooth velvety cloud-like quality.

I've used the microwave to make the lemon curd in just a couple of minutes, it's so simple. Click on the picture below to see the quick video tutorial (written instruction and ingredients are included below):


The lemon cream curd can also be used as a frosting for cupcakes, filling for whoopie pies or as a topping for pancakes or scones (biscuits).


Lemon cream and raspberry tartlettes makes 10

Sweet pastry cases (CLICK HERE FOR RECIPE)
Lemon cream (recipe below)
Punnet raspberries

To assemble tarts spoon or pipe lemon cream into pastry cases and top with raspberries.

Microwave Lemon Curd Cream
This recipe can be doubled, you will just need to increase the amount of time you microwave for, bursts can be increased to 30 seconds and continue until the mixture is thick enough to coat the back of a spoon (see video for demonstration).

50g (1 3/4 oz) lemon juice
2 large eggs
75 g caster(2 5/8oz) (superfine*) sugar
50g (1 3/4oz) unsalted butter (room temp)
1 1/2 sheets gelatine (gold leaf) #available at good food stores or see below for link to gelatine at Amazon
1/2 cup cream
*use regular white sugar if you can't locate superfine


Place lemon juice, eggs, sugar and butter into a microwave safe dish and whisk.

Heat in microwave at high for 20 seconds, remove from microwave and whisk well. Return to microwave and heat at high for another 20 second burst and then whisk again. Repeat process another 2 times. The mixture should be thick enough to cover the back of a spoon.

Meanwhile tear the gelatine into smaller pieces and pop into a dish of cold water for around a minute until soft. Remove as much excess water as possible and discard the water keeping the softened gelatine sheets.

Whisk the softened gelatine sheets into the lemon curd mixture.

Cover the lemon curd with plastic wrap, pushing the wrap down onto the surface or the curd to prevent a skin from forming and pop into the fridge to chill until set.

Once the curd is chilled. Place the 1/2 cup of cream in a bowl and whip to firm peaks using an electric mixer (I used a hand mixer). Then using an electric mixer (I used the same hand mixer) whip the curd until smooth. Spoon the cream into the whipped curd and mix at high speed until well combined and the mixture is smooth.


Linda Vandermeer is a blogger, baker, maker and author of the cookbook ' Sweets on a Stick': More than 150 kid friendly recipes for cakes, candies, cookies and pies on the go!. Published in the US the book is available at most online book stores.

Original Ideas, photography and recipes by Linda Vandermeer do not reuse without permission. 

Tuesday, May 13, 2014

Homemade sweet pastry shell recipe


When I was younger I was always a bit scared of pastry cases. I suspect I must have had a bad experience with crumbly or too sticky pastry not rolling out and I gave up. Or maybe it was rubbing or cutting in the butter - I'm the first to admit that's not my strongest baking talent.

But I worked out if you have a blender it is so simple to make delicious sweet pasty shells that taste way better than the ones you can buy at the shop ready to fill.

I've done up this quick video tutorial to show how easy it is to make them yourself (or the written instructions and ingredients are below):


So these pastry cases have only 4 ingredients and you just whip them up in the blender, knead them a little, chill and roll out.


Pretty much if you can make roll out sugar cookies you can totally make these tarts.

Once you have mastered whipping these tarts up the options are endless, you can fill them with chocolate, cream and fruit, curd, custard. OK you get the picture pretty much anything.

I'll be having a series of posts in the near future with yummy fillings for you to try (some pictures included underneath recipe below).

Sweet Pastry Shell recipe

225g (8oz) plain (all purpose) flour
45g (1 1/2oz) icing sugar (powdered sugar)
125g (4 3/8oz) cold butter cut into cubes
1 egg yolk

Place flour and sugar into the bowl of a blender. Add the butter distributing it evenly over the top of the flour/sugar mixture.

Blend until the butter has been distributed and there are no large pieces left. The mixture will look like yellow sand.

Add the egg yolk and blend for another 30 seconds or until the mixture starts to clump together.

Tip the mixture onto your workbench and knead together. Form into a disc, cover with plastic wrap and chill for 30 minutes.


When ready to cut out, dust workbench and rolling pin lightly with plain (all purpose) flour and roll out the pastry, lifting and turning as you roll. Lifting and turning stops the pastry from sticking and contributes to the finished pastry being even.

Cut the pastry to shape and gently press into pan or dish cutting off any excess. For larger sizes you may like to use a fork to pierce the bottom of the uncooked pastry shell.

Place uncooked shells into the freezer for 30 minutes (or refrigerate until firm).

Preheat oven to 180C (350 F).

Place the uncooked shells onto a tray and cut pieces of baking paper (parchment paper) out a little large than each shell. Using baking weights, beans or rice (or I used a glass) weigh down the center of the paper.

Bake the shells for 10 minutes or until they just start to turn golden, remove the weights and paper and then continue to bake for another 5 minutes.

Allow to cool and fill as desired.

Can be stored in an airtight container at room temperature until required for 5 days.

Caramel Macadamia tart (recipe coming soon)

Linda Vandermeer is a blogger, baker, maker and author of the cookbook ' Sweets on a Stick': More than 150 kid friendly recipes for cakes, candies, cookies and pies on the go!. Published in the US the book is available at most online book stores.

Original Ideas, photography and recipes by Linda Vandermeer do not reuse without permission. 

Lemon Cream tart (CLICK HERE for recipe)

Monday, May 5, 2014

Cookies and Cream Elegant Stacked Oreo Cake


Mr Sweet just had his Birthday and seeings as he likes Oreo's I came up with this kinda elegant Oreo stack cake instead of making an elaborately decorated cake he wouldn't enjoy.

 I have seen those pictures around where you just stack up a few boxes of Oreo cookies and I guess he would have been happy.

But I don't think it would have made me totally happy so this cake is the perfect balance of cake and cookies.


I did do a stack of Oreo's up on top as shown in the pictures but as it turned out Mr Sweet preferred the cake without the extra cookie stack, so I ended up taking them off.

I think it's because he wanted all those extra cookies to eat himself later ;)


I often get asked how the tall cakes slice up and this one cuts quite well. I served each of those tall slices up into 3 pieces (so 1 Oreo each) and there was no falling apart.


You could definitely make this cake into a double or triple tiered cake and it would make a fun and quirky wedding cake. The chocolate cake I have used in quite a sturdy cake, of course you would need to dowel it properly.

Cookies and Cream Elegant Stacked Oreo cake (serves 24 to 33 depending on how you cut the cake)
I find that the Oreo cookies become a little soft if you stick them on the cake too soon. You can make the chocolate cake 3 days before, fill and frost 2 days before serving and then stick the cookies on as soon before serving/displaying as possible.

Ingredients
2 X 15cm (6") chocolate cakes cut horizontally in half (recipe below)
1 batch cookies and cream Italian Meringue Butter cream (recipe below)
plus reserved 1/2 cup plain butter cream
5 boxes X 150g Oreo cookies approx 70 cookies (US 2 boxes) - use some of these to make cookies and cream butter cream.

Spoon around 3/4 cup butter cream onto the top of one chocolate cake layer and smooth with spatula. Pop a second layer on top of the smoothed butter cream making sure the cakes line up and then top with another 3/4 cup butter cream once again smoothing flat with a spatula.

Place cake in fridge to chill for around 10 minutes.

Remove cake from fridge add a third layer of cake and then another 3/4 cup butter cream and smooth flat with spatula.

Add the final layer of cake making sure the cakes are even and aligned and then give the cake a crumb coat of butter cream (a thin rough coat off butter cream).

Chill cake for another 10 to 30 minutes (depending on the weather) until cake is firm. Cover cake with remaining butter cream making sides and top as even as possible. Chill for 15 to 30 minutes until butter cream is firm and then use a tall cake scraper to make the edges an top of cake as even as possible.

When ready to serve use the reserved butter cream to stick the Oreos around the edge of the cake as per picture. I used 33 Oreos in total to surround the cake (11 rows with 3 in each row).

Stack remaining Oreos on top of cake as per picture. If you will be moving the cake you can stick them on with extra butter cream.


Cookies and Cream Italian Meringue Butter cream
Make sure your bowl and mixer are clean to whip egg whites. I use a stand mixer with a pouring shield to make this butter cream, the sugar syrup is very hot, make sure you take appropriate safety precautions when pouring the hot sugar syrup mixture. Not suitable for young children to make.

300g white sugar (12oz)
75g (2 3/4oz) water
5 egg whites
450g (1 pound - 4 sticks) unsalted butter cut into smallish cubes
1 tsp vanilla extract
Around 8 - 10 Oreo cookies (from the 5 boxes required above)

Place sugar and water into saucepan over high heat and bring to boil. Conintue to  heat until the sugar syrup mixture reaches 115 C (240F). Brush down the the sides of saucepan with a wet pastry brush as required to stop sugar crystals from forming.

Place the egg whites in the bowl of your mixer (make sure the bowl is quite large). When the sugar syrup reaches 110C (210F) start to whip the egg whites at high speed.

Once the sugar syrup reaches 115C (240 F) carefully pour the syrup into the whipped egg whites whilst the mixer is still beating on high.

Continue to beat until the egg and sugar mixture cooled to room temperature (or the bowl feels cool to touch) and then start to add a few cubes of butter at a time. Add the vanilla.

The mixture will probably become quite liquid, but continue to beat until it thickens and all the butter is evenly distributed. May take around 10 minutes.

Place the Oreos in a plastic or ziplock bag and crush using a rolling pin or mallet until the Oreos are broken down into crumbs. I like mine a bit chunky in bits.

Reserve 1/2 cup of butter cream for cake assembly.

Using a spatula gently fold the broken Oreo cookies through the remaining butter cream. Use immediately.


Chocolate Cake

220g (7 3/4oz) unsalted butter
220g (7 3/4oz) dark chocolate
2 Tbsp (US 2 Tbsp + 2 tsp) instant coffee granules
135g (4 3/4oz) hot water
125 g (4 3/8 oz) plain flour (all purpose flour)
125 g (4 3/8 oz)self raising flour
50 g (1 3/4 oz) cocoa
1/2 tsp baking powder
480 g (1 lb 7/8 oz) caster sugar (superfine sugar)
4 large eggs
1 tsp vanilla extract
115g (4oz) light olive oil
100 g (3 1/2oz) plain greek yogurt (I used Chobani)

Grease and flour 2 x 6 inch (15cm) baking tins and line the bottom with parchment (baking) paper.

Preheat oven to 160 C (320 F)


In a large bowl sift together both flours, cocoa, baking powder and sugar.

Place chocolate and butter in a microwave safe bowl and heat at medium heat (50%) for 2 minutes. Stir and then heat for a further 2 minutes at medium heat. All the chocolate should be melted, if not continue to heat in microwave.

Combine hot water and granulated coffee and mix until dissolved.

Add the eggs, chocolate mixture, vanilla, oil, coffee mixture and yogurt to the dry ingredients and using a whisk mix until just combined.

Divide mixture evenly between the 2 tins and bake for around 1 hour 10 minutes checking with a skewer after 1 hour.

Cool for 10 minutes and then turn out of tin to cool on rack.


Linda Vandermeer is a blogger, baker, maker and author of the cookbook ' Sweets on a Stick': More than 150 kid friendly recipes for cakes, candies, cookies and pies on the go!. Published in the US the book is available at most online book stores.

Affiliate links may earn me money and contribute to supporting this blog.

Original Ideas, photography and recipes by Linda Vandermeer do not reuse without permission. 


Wednesday, April 30, 2014

How to make Pretty Shabby Chic Cookies


Mothers day is just about here and I thought I would share how to make these lovely sweet shabby chic inspired cookies.


I designed these cookies a while back for my lovely friend Jo's birthday high tea celebrations.

I truly love them and they are so pretty that you can use them for so many occasions. Plus of course you can change the colours (like I have in the photo's from pink to light blue) to suit any party scheme.


If you don't like fondant (or marshmallow fondant) of course you can always do a royal icing base instead of the embossed fondant and then just pop the frilled oval and flower decoration on top.

Pretty GreenGate tins from Mollegaarden Denmark

Not Too Shabby Cookies
Don't worry too much if you don't have the exact flower cutters, for example you could use a small blossom cutter in place of the small daphne cutter in a pinch.

Free video tutorial link:

Fancy square plaque cookie cutter (see link at end of post for example)
Fancy square plaque cookies (CLICK HERE FOR COOKIE RECIPE)
Patchwork quilting embosser (see link at end of post for example)
Cornflower/ cornstarch
Brush and water
small rolling pin
fondant (pink, blue, white)
Dark pink sugar flowers (Click here for tutorial)
Frilled oval cutter
Daphne plunger cutter (see link at end of post for example)
Flower/leaf shaping tool
Royal icing - White in piping bag with plain round tip (#2)
Royal icing - Bright green (I used Americolor Electric Green) in piping bag with leaf tip (#65)
** Remember that fondant dries out quickly so cover in plastic wrap while not in use and knead before rolling out.


Dust the workbench with cornflower/cornstarch and roll out the pink fondant. Press the fancy square plaque cutter into the fondant to cut out the shape.

Brush the cookie lightly with water and place the fondant on top of the cookie, press gently into place using the rolling pin.

Take the embosser and place it on top of the cookie, ensuring that it is evenly aligned with the top.Press down firmly with even pressure all around the cookie surface, lift the embosser off. If the fondant lifts, press it lightly back down in place.

Roll out the white fondant and use the frilled oval to press out a shape.

Lightly brush water in the middle of the cookie and place the oval in the middle of the cookie.

Use the sharp edge of the leaf shaping tool to pop a hole in each curve around the edge of the oval shape (see picture).

Roll out the blue fondant, cut out three small daphne flower shapes using the plunger. Use the leaf tool on each of the petals to press a 'vein' indent in the middle.


Secure the dark pink flower and the three blue daphne flowers in place with a dot of royal icing.

Pipe a center dot of royal icing in each of the blue daphne flowers. Then pipe a white dot of royal icing at each intersection of the quilting embossed design on the pink fondant (that is the corners where the lines meet).

Pipe a few leaves around the flowers using the green royal icing with the #65 leaf tip by placing the tip on the cookie where you would like the leaf to start at a 45degree angle, apply light pressure to the piping bag and pull the tip away from the surface moving slightly up and down parallel to the cookie. Release the pressure on the bag while continuing to pull the tip away to form a pointed edge.

Allow the decorations to set.

Decorated cookies can be made up to a week ahead stored in an airtight container.


Linda Vandermeer is a blogger, baker, maker and author of the cookbook ' Sweets on a Stick': More than 150 kid friendly recipes for cakes, candies, cookies and pies on the go!. Published in the US the book is available at most online book stores.

Affiliate links may earn me money and contribute to supporting this blog.

Original Ideas, photography and recipes by Linda Vandermeer do not reuse without permission. 


Tuesday, April 22, 2014

Cheesy Bacon Baked Egg recipe


Growing up baked eggs was one of my favorite breakfasts. It seemed so deliciously fancy so you can image my surprise when my mother showed me how to make it and I realised how very simple it is to make.


Fast forward many years and this became my signature dish for family brunch get togethers and once again this little dish tricked everyone into believing it was way complex than it really is.

It is the perfect bring along breakfast dish as you can easily prepare the cheese and bacon ahead of time, pop a carton of eggs, cream, ramkins and the prepared bacon/cheese mixture into a bag then quickly assemble and bake on site.

This dish is also fabulous to find any hotspots in your oven with the eggs clearly showing any areas that are cooking faster than the others. If this happens you may need to turn the tray around half way through cooking.


I normally serve my baked eggs in plain white ramkins which hold around 150ml (4oz) approx 2/3cup like the ones pictures above.

Baked Eggs serves 4
Recipe can be halved, doubled or quadrupled. The cooking time may change depending on type of ramkin used. Ramkins should hold approx 2/3 cup.

4 eggs
8 rashers short cut bacon (or 6 regular bacon rashers)
3/4 cup grated cheese
4 teaspoons cream
olive oil spray

Preheat oven to 180C (350 F ).


Spray a light coat of olive oil into 4 ramkins.

Chop the bacon into 1cm (1/3") squares. If using regular bacon make sure you remove the skin.

Combine shopped bacon with grated cheese in a large bowl and mix together.

Divide bacon cheese mixture evenly between the 4 ramkins.  Make a little well in the center for the egg yolk to sit in.


Break an egg into each ramkin and then drizzle 1 tsp of cream around the edge of yolk, repeating for each ramkin.

Place on a baking tray and place in oven between 15 - 25 (approx) minutes depending on how you like your eggs done. You will be able to see the egg whites and yolks change colour and become more opaque as they cook.

Remove from oven and serve. The ramkins will be very hot. If serving to children I recommend that you scoop the baked egg out of the ramkin and pop onto a plate prior to serving.


Linda Vandermeer is a blogger, baker, maker and author of the cookbook ' Sweets on a Stick': More than 150 kid friendly recipes for cakes, candies, cookies and pies on the go!. Published in the US the book is available at most online book stores.

Affiliate links may earn me money and contribute to supporting this blog.

Original Ideas, photography and recipes by Linda Vandermeer do not reuse without permission. 


Thursday, April 17, 2014

How to make pretty chocolate Easter eggs

(How to decorate pretty Easter eggs tutorial down below)

Easter is almost here so I thought it would be fun to decorate some homemade Easter eggs.


These eggs are for non-chocolatier people like me. No fancy tempering the chocolate and the edges are a bit messy.

But what they lack in perfection they make up in charm and the kids sure didn't notice any problems with them.


I made a few in dusty pink and soft mint green, decorated them with some sugar flowers and then bribed the kids with the eggs so I could get a couple of nice pictures.


Oh how sweet is that old basket they are holding, I've had it for years and years. I may have even got it from the Easter Bunny when I was a little girl :)


The Destroyer even joined in, see that is I can believe I have to hold these eggs when I really want to be eating them face.

Easter egg moulds can be found for a very reasonable price in discount and dollar stores around Easter.

How to make pretty Easter eggs
These eggs are quite delicate and not really suitable for very warm weather, if you do a double layer of chocolate they will be a bit more stable. Can be made 1 week ahead of time and stored in a cool place.

Here is a quick free video tutorial showing how I made them, for written step by step instructions, plus links to the fondant flower see below:


Ingredients and Equipment

White chocolate melts  (US - these are actually white chocolate not candy melts)
Oil based food color (or gel food color and Flo-Coat)*
#optional - Oil based raspberry essence
Egg Mould
Sugar Flowers (see below for links to tutorials)
Royal Icing

How to make Blue fondant Flowers Tutorial CLICK HERE for link
How to make Easy Sugar Blossoms CLICK HERE for link

Place the white chocolate in a microwave safe bowl and melt at medium low heat in the microwave for 2 minutes. Make sure the heat is low otherwise the chocolate may seize and become unusable. Remove from microwave and stir for 30 seconds. If required return to microwave and heat at medium low heat for another 1 minute, then remove and stir until smooth. Continue until all the chocolate is melted.


To color the chocolate add a drop or 2 of oil based food color. You can not use regular water based food color* or the chocolate will sieze and become unusable.

*To make gel food color suitable to use with chocolate, add 1 drop food color to 11 drops flo-coat, mix until well combined and then add to the melted chocolate.

Optional - If you would like to flavor the chocolate add a few drops of the raspberry oil essence.

Spoon melted chocolate into the egg mould, using the back of your spoon to ensure the chocolate comes up to the edge and then tap sharply on the workbench quite a few time to bring any air bubbles out. Most of the chocolate will have pooled in the center of the mould, so use the back of your spoon to push it back up to the edges making the chocolate coverage as even as possible. Run a knife around the top to ensure that the edge of the egg is even.


Pop the mold into the freezer for a few minutes until the chocolate is completely set.

Remove the mould from the fridge, gently pull the mould away from the chocolate at the edges and then turn the mould over. The chocolate should release easily. If it happens to crack don't worry just remelt the chocolate and start again.


Using royal icing attach flowers or decorations as desired. I added 3 large blue fondant flowers and 3 smaller sugar blossoms to these pink eggs.


Gently join the eggs together using extra melted chocolate, the edges may look a little uneven, you can carefully press extra chocolate into the gaps rubbing over the top to smooth the chocolate, or add ribbon to hide the seam.


Linda Vandermeer is a blogger, baker, maker and author of the cookbook ' Sweets on a Stick': More than 150 kid friendly recipes for cakes, candies, cookies and pies on the go!. Published in the US the book is available at most online book stores.

Affiliate links may earn me money and contribute to supporting this blog.

Original Ideas, photography and recipes by Linda Vandermeer do not reuse without permission.